NexT主题进阶配置
本文将介绍一些针对 NexT 主题的个性化配置。
NexT主题进阶配置
环境及版本声明
本文基于以下环境及版本:
1 | hexo: 3.8.0 |
若主题版本不一致,下面的配置方法可能不适用。
设置 RSS
NexT 中 RSS 有三个设置选项,满足特定的使用场景:
1 | # false:禁用 RSS,不在页面上显示 RSS 连接. |
具体操作如下:
首先在站点根目录下执行下列命令安装插件:
1 | npm install hexo-generator-feed --save |
更改 主题配置文件,设定 rss 字段的值如下:
1 | rss: /atom.xml |
重新生成、启动服务器显示如下:
添加 tags 页面
新建「标签」页面,并在菜单中显示「标签」链接。「标签」页面将展示站点的所有标签,若你的所有文章都未包含标签,此页面将是空的。下面是一篇包含标签的文章的例子:
1 | --- |
新建页面
在终端窗口下,定位到 Hexo 站点目录下。使用 hexo new page 新建一个页面,命名为 tags :
1 | hexo new page tags |
设置页面类型
编辑刚刚新建的页面(source/tags/index.md),将页面的类型设置为 tags ,主题将自动为这个页面显示标签云。页面内容如下:
1 | --- |
修改菜单
在菜单中添加链接。编辑 主题配置文件,添加 tags 到 menu 中,如下:
1 | menu: |
注意
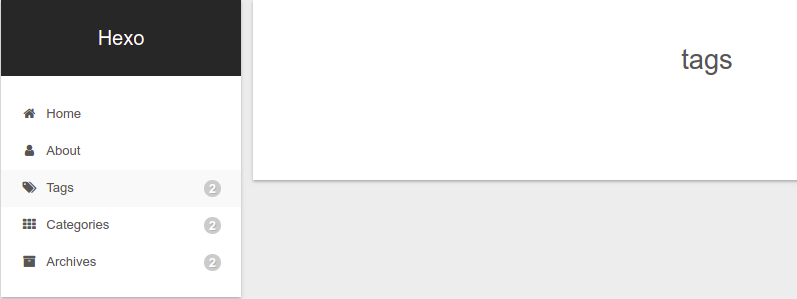
如果没有设置页面类型,默认情况下「标签」页面 会被当成普通页面,我们文章的标签信息不会出现在「标签」页面中,例如:
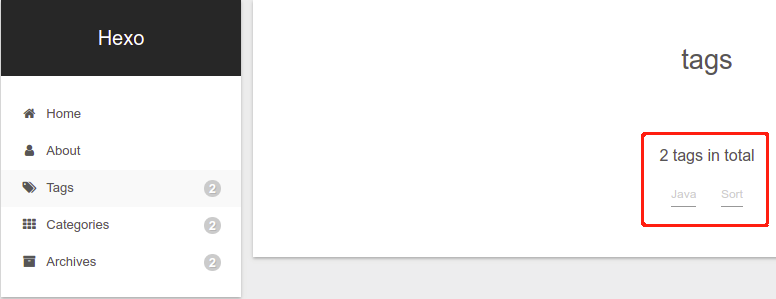
在设置了页面类型后,再打开:
如果有集成评论服务,页面也会带有评论。若需要关闭的话,请添加字段 comments 并将值设置为 false,如:
1 | --- |
添加 categories 页面
与 "添加 tags 页面" 类似
新建页面
1 | hexo new page categories |
设置页面类型
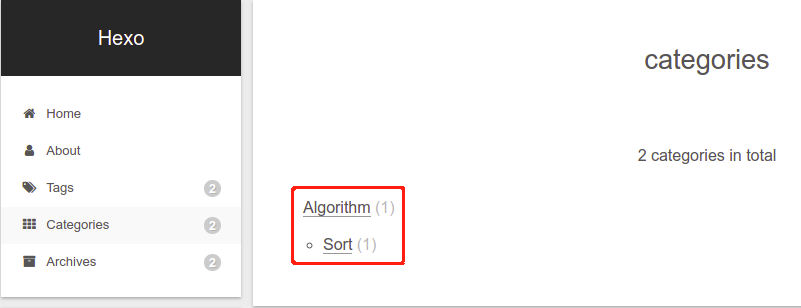
编辑刚刚新建的页面(source/categories/index.md),将页面的类型设置为 categories ,主题将自动为这个页面显示分类。页面内容如下:
1 | --- |
修改菜单
在菜单中添加链接。编辑 主题配置文件,添加 tags 到 menu 中,如下:
1 | menu: |
注意
如果没有设置页面类型,则文章的分类信息不会出现在「分类」页面中,下面是设置了页面类型后的示例:
如果有集成评论服务,页面也会带有评论。若需要关闭的话,请添加字段 comments 并将值设置为 false
设置阅读全文
在首页显示一篇文章的部分内容,并提供一个链接跳转到全文页面是一个常见的需求。NexT 提供三种方式来控制文章在首页的显示方式。也就是说,在首页显示文章的摘录并显示 阅读全文 按钮,可以通过以下方法实现:
使用 <!-- more -->
在文章中嵌入 <!-- more --> 标记,Hexo 会将其之上的内容作为首页预览内容,这是 Hexo 提供的方式
使用 description
在文章的 front-matter 中添加 description,并提供文章摘录
使用 NexT 配置
如果需要自动形成摘要,则将 auto_excerpt 下的 enable 设置成 true,默认截取的长度为 150 字符,可以根据需要在 主题配置文件 中自行设定:
1 | # 自动将页面滚动到<!-- more -->标记下的部分. |
Hexo 建议使用
<!-- more -->(即第一种方式),除了可以精确控制需要显示的摘录内容以外,可以让 Hexo 中的插件更好的识别。
设置文章置顶
默认顺序
Hexo 默认主页文章按日期降序。
1 | # Home page setting |
安装 hexo-generator-index-pin-top
首先是卸载默认排序插件,安装新插件,新插件支持文章置顶:
1 | npm uninstall hexo-generator-index --save |
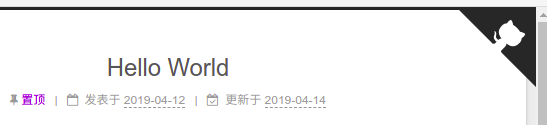
置顶文章
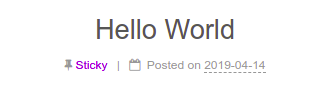
在需要置顶的文章的 front-matter 中设置 top: 1 即可实现文章置顶功能,并且数字越大文章越靠前,如:
1 | --- |
添加置顶图标
上面置顶文章会文章排在前面,但是不会有任何有关 "置顶" 的标识。我们可以修改 NexT 主题的/themes/next/layout/_macro/post.swig 文件,在 <div class="post-meta"> 下加入 "置顶" 标识,如图标和文字描述:
1 | {% if post.top %} |
此时的效果如下:
设置代码块高亮
NexT 使用 Tomorrow Theme 作为代码高亮,共有5款主题供你选择。 NexT 默认使用的是 白色的 normal 主题,可选的值有 normal,night,night blue,night bright,night eighties,对应的展示效果可到 Tomorrow Theme 查看:
1 | # Code Highlight theme |
启用代码块复制功能
编辑 主题配置文件,启用 codeblock 模块,如下:
1 | codeblock: |

设置 copy_button: true,启用复制按钮;同时设置 show_result: true,显示代码复制结果。
修改文章链接样式
打开文件 /themes/next/source/css/_common/components/post/post.styl,在末尾添加以下 CSS 样式:
1 | .post-body p a{ |
颜色可自定义,在这里选中状态为橙色,链接样式为蓝色,效果如下:
修改文章底部标签样式
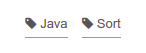
打开模板文件 /themes/next/layout/_macro/post.swig,找到 for tag in post.tags 部分,将 # 换成 <i class="fa fa-tag"></i>,如下:
1 | {% for tag in post.tags %} |
修改后,效果如下:
统一添加文章结束标记
在 /themes/next/layout/_macro 下新建 passage-end-tag.swig 文件,并添加以下代码:
1 | <div style="text-align:center;color: #ccc;font-size:14px;">-------------本文结束 <i class="fa fa-heart"></i> 感谢阅读-------------</div> |
打开 /themes/next/layout/_macro/post.swig 文件,在 END POST BODY 后面引入 passage-end-tag.swig,如下:
1 | {#####################} |
在 主题配置文件 _config.yml 的末尾添加以下配置:
1 | # 文章结束标记 |
该配置为自定义配置,与上面的代码配套使用,方便通过简单的配置来启用或者关闭文章结束标记。显示效果如下:

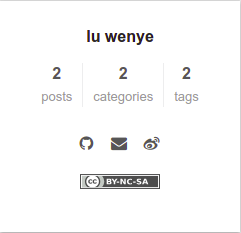
添加版权信息
编辑 主题配置文件,修改如下配置:
1 | # Creative Commons 4.0 International License. |
by-nc-sa 表示 署名-非商业性使用-相同方式共享,更加详细的解释请查阅官网 creativecommons.org
设置 sidebar: true 后,显示效果如下:
设置 post: true 后,显示效果如下:

如果需要自定义文章底部版权信息的,可以自行修改 /themes/next/layout/_partials/post/post-copyright.swig 文件。
设置打赏功能
首先将你的 WeChat Pay / Alipay / Bitcoin 的收款二维码图片放到 /themes/next/source/images 文件夹下,或者上传到图床并获取它们的绝对 HTTP 地址。
编辑 站点配置文件,启用打赏功能,例如选择使用微信支付和支付宝:
1 | # Reward (Donate) |
效果如下:

点击打赏按钮:

设置站点背景
NexT 默认提供3种背景配置,但都需要安装依赖。以下配置均不修改 vendors: 下的内容。
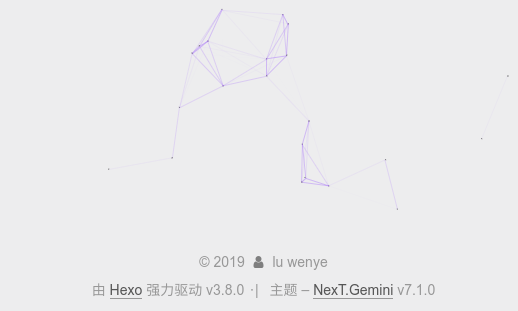
Canvas-nest 背景
Step 1
进入到 NexT 主题目录下:
1 | cd themes/next |
Step 2
安装模块到 source/lib 目录下:
1 | git clone https://github.com/theme-next/theme-next-canvas-nest source/lib/canvas-nest |
Step 3
编辑 主题配置文件,启用 cavas_nest 模块,如下:
1 | # Canvas-nest |
在 站点根目录下 启动服务器,显示效果如下(其它设置可根据需要自行修改):
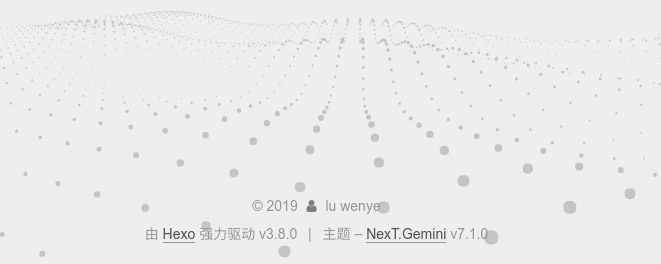
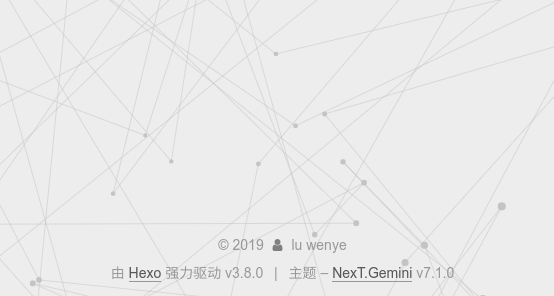
JavaScript 3D library 背景
Step 1
进入到 NexT 主题目录下:
1 | cd themes/next |
Step 2
安装模块到 source/lib 目录下:
1 | git clone https://github.com/theme-next/theme-next-three source/lib/three |
Step 3
编辑 主题配置文件,设 three_waves,canvas_lines,canvas_sphere 其中一项为 true,如下:
1 | # JavaScript 3D library. |
在 站点根目录下 启动服务器,three_waves 显示效果如下:
canvas_lines 效果如下:
canvas_sphere 效果如下:
Canvas-ribbon 背景
Step 1
进入到 NexT 主题目录下:
1 | cd themes/next |
Step 2
安装模块到 source/lib 目录下:
1 | git clone https://github.com/theme-next/theme-next-canvas-ribbon source/lib/canvas-ribbon |
Step 3
编辑 主题配置文件,启用 canvas_ribbon 模块,如下:
1 | # Canvas-ribbon |
在 站点根目录下 启动服务器,显示效果如下:
设置左上角或右上角 github 图标
开启默认设置
NexT 支持通过配置开启右上角 github 图标,编辑 主题配置文件,启用 github-banner 如下:
1 | # `Follow me on GitHub` banner in the top-right corner. |
效果如下:
进阶自定义设置
自定义配置使其可以使用 GitHub Ribbons 和 GitHub Corners 中的任何一款图标。
修改 /themes/next/layout/_partials/github-banners.swig 文件内容如下:
同时编辑 站点配置文件,修改 github_banner 部分如下:
1 | # `Follow me on GitHub` banner in the top-left or top-right corner. |
这样你就可以通过 type 随意切换 banner 的样式了。
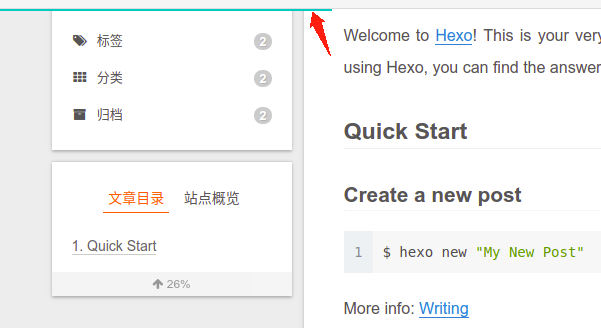
设置侧栏阅读进度百分比
编辑 站点配置文件,修改 back2top 部分如下:
1 | back2top: |
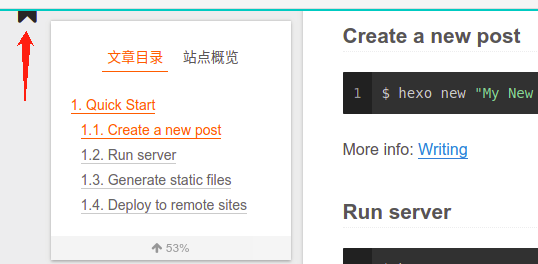
设置顶部阅读进度条
Step 1
进入到 NexT 主题目录下:
1 | cd themes/next |
Step 2
安装模块到 source/lib 目录下:
1 | git clone https://github.com/theme-next/theme-next-reading-progress source/lib/reading_progress |
Step 3
编辑 主题配置文件,启用 reading_progress 模块,如下:
注意:不是vendors:下的reading_progress
1 | # Reading progress bar |
设置顶部页面加载进度条
Step 1
进入到 NexT 主题目录下:
1 | cd themes/next |
Step 2
安装模块到 source/lib 目录下:
1 | git clone https://github.com/theme-next/theme-next-pace source/lib/pace |
Step 3
编辑 主题配置文件,启用 pace 模块,如下:
注意:不是vendors:下的pace
1 | # Progress bar in the top during page loading. |
设置阅读位置标记功能
Bookmark 是一个插件,允许用户保存他们的阅读位置。只需单击页面左上角的书签图标(如书签)即可保存阅读位置,当他们下次访问您的博客时,他们可以通过单击主页上的书签图标继续读取最后一个位置。
注意:实测当站点语言设置为 en 时,该功能不能正常使用,若设置为 zh-CN 可以正常使用,其它语言未测试。
Step 1
进入到 NexT 主题目录下:
1 | cd themes/next |
Step 2
安装模块到 source/lib 目录下:
1 | git clone https://github.com/theme-next/theme-next-bookmark.git source/lib/bookmark |
Step 3
编辑 主题配置文件,启用 bookmark 模块,如下:
注意:不是 vendors: 下的 bookmark
1 | # Bookmark Support |
启用数学公式渲染引擎
编辑 主题配置文件,修改 bookmark 配置,如下:
1 | # Math Equations Render Support |

设置 enable: true,即启用引擎渲染数学公式。per_page 表示是否自动渲染每一页,如果为 true 则只渲染 front-matter 中包含 mathjax: true 的文章。例如:
1 | --- |
要想更好的支持 mathjax 需要安装 hexo-rendering-pandoc (或者 hexo-renderer-kramed),详见 Hexo相关问题和优化 中有关数学公式渲染的说明。
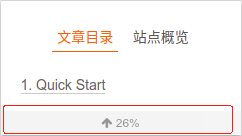
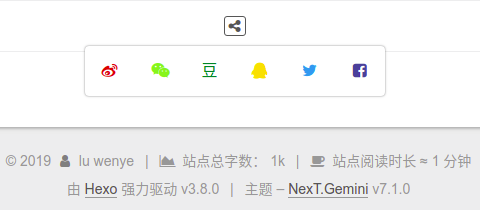
设置字数统计和预计阅读时间
包括文章字数统计、预计阅读时间,和页面底部站点总字数统计、总阅读时间预计。
Symbols count and time to read of articles.
Better than
hexo-reading-timeand faster thanhexo-worcount. No external dependencies.
插件 hexo-symbols-count-time 的使用说明详见 https://github.com/theme-next/hexo-symbols-count-time
Step 1
进入到工程目录下,安装 Hexo 插件:
1 | npm install hexo-symbols-count-time --save |
Step 2
编辑 站点配置文件,添加如下内容:
1 | # Hexo plugin: hexo-symbols-count-time |
Step 3
此插件集成在 NexT 主题中,在 Hexo 站点配置文件 中启用插件后,你可以调整 NexT 配置中的选项,查看 主题配置文件,配置如下:
1 | # Post wordcount display settings |
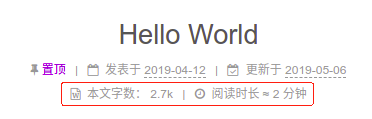

如果 separated_meta: false,则效果如下:

平均字长(平均一个字的字符数),默认值:4。awl- CN≈2
- EN≈5
- RU≈6
每分钟阅读字数,默认值:275。wpm- 慢≈200
- 正常≈275
- 快≈350
中国用户注意事项:因为中文平均字长约为 1.5,如果你大多数情况下用中文写帖子(没有混合英文),建议将 awl 设置为 2,将 wpm 设置为 300。但是,如果你通常将你的帖子与英语混合,那么 awl 到 4 和 wpm 到 275 就会很好。
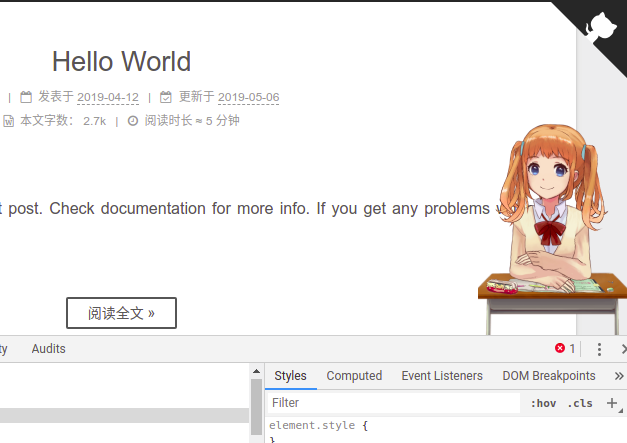
添加 Live2D 看板娘 萌宠
插件 hexo-helper-live2d 的使用说明详见 https://github.com/EYHN/hexo-helper-live2d
详细配置过程及说明推荐参考 Miaia 的博客 用Live2D让看板喵入住你的Hexo博客吧(o)/~
Step 1
进入到工程目录下,安装 Hexo 插件:
1 | npm install hexo-helper-live2d --save |
Step 2
在 插件作者的博客 中挑选一个模型,记录该模型的名字。模型资源名称为 live2d-widget-model-模型名称,例如选择模型 shizuku ,则其对应的 Live2D 资源名称为 live2d-widget-model-shizuku,然后直接在站点根目录下安装该模型,命令如下:
1 | npm install live2d-widget-model-shizuku --save |
Step 3
编辑 站点配置文件,添加如下内容:
1 | # Hexo plugin: hexo-helper-live2d |
执行命令 hexo clean && hexo g && hexo s,效果如下:
配置项说明,摘自 Miaia 博客 用Live2D让看板喵入住你的Hexo博客吧(o)/~
| 配置项 | 类型 | 属性 | 备注 |
|---|---|---|---|
| enable | Boolean | true或者false |
控制live2d插件是否生效。 |
| scriptFrom | String | local或者jsdelivr或者unpkg |
l2dwidget.js使用的CDN地址,local表示使用本地地址。 |
| pluginRootPath | String | 例如:live2dw/ |
插件在站点上根目录的相对路径。 |
| pluginJsPath | String | 例如:lib/ |
脚本文件相对与插件根目录路径。 |
| pluginModelPath | String | 例如:assets/ |
模型文件相对与插件根目录路径。 |
| tagMode | Boolean | true或者false |
标签模式, 控制是否仅替换tag标签而非插入到所有页面中。 |
| debug | Boolean | true或者false |
调试模式, 控制是否在控制台输出日志。 |
| model.use | String | 例如:live2d-widget-model-hijiki |
npm 模块包名(上文例中即使用的这个方式)。 |
| model.use | String | 例如:hijiki |
博客根目录/live2d_models/ 下的目录名。 |
| model.use | String | 例如:./wives/hijiki |
相对于博客根目录的路径。 |
| model.use | String | 例如:https://域名/model.json |
你自定义live2d模型json文件的url。 |
| model.scale | Number | 可选值,默认值为 1 |
模型与canvas的缩放。 |
| model.hHeadPos | Number | 可选值,默认值为 0.5 |
模型头部横坐标。 |
| model.vHeadPos | Number | 可选值,默认值为 0.618 |
模型头部横坐标。 |
| display.superSample | Number | 可选值,默认值为 2 |
超采样等级。 |
| display.width | Number | 可选值,默认值为 150 |
canvas的长度。 |
| display.height | String | 可选值,默认值为 300 |
canvas的高度。 |
| display.position | Number | 可选值,默认值为 right |
显示位置:左或右。 |
| display.hOffset | Number | 可选值,默认值为 0 |
canvas水平偏移。 |
| display.vOffset | Number | 可选值,默认值为 -20 |
canvas水平偏移。 |
| mobile.show | Boolean | 可选值,默认值为 true |
控制是否在移动设备上显示。 |
| mobile.scale | Number | 可选值,默认值为 0.5 |
移动设备上的缩放。 |
| react.opacityDefault | Number | 可选值,默认值为 0.7 |
默认透明度。 |
| react.opacityOnHover | Number | 可选值,默认值为 0.2 |
鼠标移上透明度(此项貌似没有效果)。 |
添加文章分享按钮
Step 1
进入到 NexT 主题目录下:
1 | cd themes/next |
Step 2
安装模块到 source/lib 目录下:
1 | git clone https://github.com/theme-next/theme-next-needmoreshare2 source/lib/needsharebutton |
Step 3
编辑 主题配置文件,启用 needmoreshare2 模块,如下:
1 | # NeedMoreShare2 |
启用 postbottom 分享按钮,点击按钮效果如下:
启用 float 分享按钮,点击按钮效果如下:
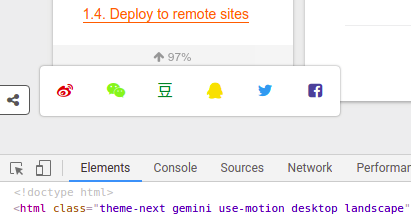
这两个分享按钮可同时启用,也可以单独使用其中一个,其它参数配置效果可自行测试。
设置网页底部信息
查看 主题配置文件,默认 footer 配置如下:
1 | footer: |
默认效果如下:

注意:默认是没有 站点总字数 和 站点阅读时长 的,这里有相关显示是因为上面启用了统计功能。
设置建站时间
编辑 footer 下的 since 配置如下,例如建站时间为2019,则:
1 | footer: |
设置版权所有者
编辑 footer 下的 copyright 配置如下,例如版权所有者为 wylu,则:
1 | footer: |
设置建站时间和版权所有者之间的图标
编辑 footer 下的 icon 配置如下:
1 | footer: |
这里使用 fa-heart 的图标,并且启用动画和设置 icon 的颜色为红色。
隐藏 Hexo 和 NexT 信息
编辑 footer 下的 powered 和 theme 配置如下:
1 | footer: |
修改完配置后,效果如下:

添加站点运行时间
在 /themes/next/layout/_custom 文件夹下新建一个名称为 site-runtime.swig 的文件,并添加内容如下:
1 | <div id="site-runtime"> |
编辑文件 /themes/next/layout/_partials/footer.swig,在文件底部添加如下内容:
1 | {% if theme.footer.runtime.enable %} |
编辑 主题配置文件,在 footer 下添加如下配置作为其子配置项:
1 | # Site Runtime |

注意:runtime 必须在 footer 下才能正常工作,与 footer 下的 theme 是平级关系,该配置支持设置是否在移动端显示,不支持修改展示文本语言。对于要修改展示文本语言的,可以直接修改 site-runtime.swig 文件。
添加鼠标点击效果
爱心点击效果
在 /themes/next/source/js/src 下新建文件 love.js,接着把该 链接 下的 js 代码复制到 love.js 文件中。如果链接失效,可以到 博主Github 复制。如果没有 src 目录,则自行手动创建。
烟花点击效果
在 /themes/next/source/js/src 下新建文件 fireworks.js,接着把该 链接 下的 js 代码复制到 fireworks.js 文件中。
新建 click-animation.swig
在 /themes/next/layout/_custom 文件夹下新建文件 click-animation.swig,并添加如下代码:
1 | {% if theme.click_animation.enable %} |
修改 _layout.swig
在 /themes/next/layout/_layout.swig 文件 <body> 标签内的底部添加如下代码:
1 | {% include '_custom/click-animation.swig' %} |
添加自定义配置项
编辑 主题配置文件,在文件末尾添加如下配置:
1 | # Mouse Click Animation. |
当 style: love 时,效果如下:
当 style: fireworks 时,效果如下:
添加自定义404页面
参考 MOxFIVE 博客 在 Hexo 中创建匹配主题的404页面
在站点根目录下,执行如下命令创建404页面:
1 | hexo new page 404 |
编辑新建的页面文件,默认在站点根目录下 /source/404/index.md,在 front-matter 中添加 permalink: /404,表示指定该页面固定链接为 http://"主页"/404.html
1 | --- |
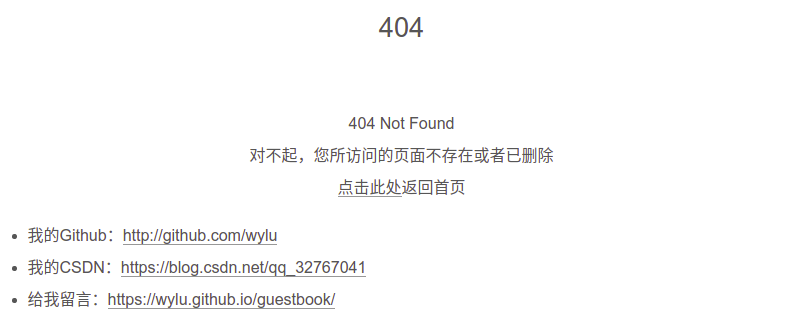
在本地打开链接 http://localhost:4000/404.html ,如果能看到如下效果,则表示配置成功。需要注意的是,在本地测试时,当你尝试跳转到一个不存在的页面时,不会显示自定义的404页面,但是当我们将页面部署到 GithubPages 时,它就会使用我们自定义的404页面。
添加图片放大预览功能
利用 Fancybox 能放大查看图片。
有 Fancybox2 和 Fancybox3 两个版本,这里使用 Fancybox3。
如果已经有 fancybox2 的,需要在站点根目录下执行下列命令进行删除:
1 | rm -rf themes/next/source/lib/fancybox |
进入到 themes/next 主题目录下,执行以下命令安装 fancybox3 模块:
1 | cd themes/next |
1 | git clone https://github.com/theme-next/theme-next-fancybox3 source/lib/fancybox |
编辑 主题配置文件,启用 fancybox,修改配置如下:
1 | fancybox: true |
放大预览效果如下: